HowTo Root the Samsung Galaxy Tab 2: Difference between revisions
mNo edit summary |
No edit summary |
||
| (One intermediate revision by the same user not shown) | |||
| Line 38: | Line 38: | ||
# Install Galaxy Tab 2 7.0 drivers on your computer. If you have already KIES installed on your computer, drivers aren’t needed. | # Install Galaxy Tab 2 7.0 drivers on your computer. If you have already KIES installed on your computer, drivers aren’t needed. | ||
# Run Odin on your computer (double click Odin3-v1.85.exe) | # Run Odin on your computer (double click Odin3-v1.85.exe) | ||
# On the tablet, Press volume down + power button simultaneously and HOLD DOWN until not only the tablet reboots, | # On the tablet, Press volume down + power button simultaneously and HOLD DOWN until not only the tablet reboots, it also goes into software download mode. | ||
# Connect the USB cable from the tablet to the computer. | # Connect the USB cable from the tablet to the computer. | ||
# Press the volume down button on the tablet to tell it to enter download mode. | # Press the volume down button on the tablet to tell it to enter download mode. | ||
| Line 55: | Line 55: | ||
[[File:Odin3v1-85_16b.png]]<BR> | [[File:Odin3v1-85_16b.png]]<BR> | ||
Illustration: The Odin interface after successfully flashing the tablet. | Illustration: The Odin interface after successfully flashing the tablet. | ||
== Verify Root Access == | |||
After the process is done, and the tablet has rebooted, everything should pretty much look the same since we didn't replace TouchWiz. You can always install a custom ROM to replace the TouchWiz interface later, now that the tablet is rooted. | |||
To verify a successful rooting of the tablet simply go to the apps tray and look for SuperSU. If you have [[ES File Explorer]] installed you should activate the "root explorer" option under settings. You will be prompted to allow root permission by SuperSU. Once you do that, you will see ES File Explorer listed in the SuperSU interface. | |||
| | ||
Latest revision as of 23:21, 4 February 2014
You may wonder Why Root My Android. If you are still wondering why, don't do it. If you know why you want to root your Android, and are fully aware of the risks, proceed.
This root guide is verified to work with:
- Samsung Galaxy Tab 2 (7) WiFi Only model
- Android Version: 4.1.1
- Model number: GT-P3113
We performed root by connecting the tablet to a Windows XP machine with SP3 installed.
It is very easy to root the Samsung Galaxy Tab 2. If your exact version of software doesn't match exactly what is listed above, the process is likely the same, with the difference of what files you need.
This will be a quick, minimum root with no custom ROMs.
Files Needed
- CF-Auto-Root-espressowifi-espressowifiue-gtp3113.zip
- Odin3-v1.85.exe
Optional (possibly needed depending on your system)
- KiesSetup.exe
Kies is a terrible piece of fat bloatware. If you are already using Kies then you won't need to install it. If you are already able to connect your Samsung tablet to your PC to transfer files without Kies, then you won't need to install Kies. Kies is a last resort to allow for USB connectivity to your tablet, something needed by Odin.
Files Function
The file Odin3-v1.85.exe installs a program called Odin. Specifically, Odin 3 version 1.85. This program will flash the root software and SuperSU.
The file CF-Auto-Root-espressowifi-espressowifiue-gtp3113.zip contains CF-Auto-Root-espressowifi-espressowifiue-gtp3113.tar.md5 which is the program Odin will read from when it flashes your tablet. It is the "data" file.
Kies is a bastard, and hopefully you wont need it. If Odin cannot see your tablet and connect to it, you will have to install Kies.
STEPS - Rooting the Device
- Extract CF-Auto-Root-espressowifi-espressowifiue-gtp3113.zip to CF-Auto-Root-espressowifi-espressowifiue-gtp3113.tar.md5 and make sure Odin is extracted too so you have Odin3-v1.85.exe
- Charge your Galaxy Tab 2 7.0 at least up to 70% to avoid any interruption during the installation process.
- Install Galaxy Tab 2 7.0 drivers on your computer. If you have already KIES installed on your computer, drivers aren’t needed.
- Run Odin on your computer (double click Odin3-v1.85.exe)
- On the tablet, Press volume down + power button simultaneously and HOLD DOWN until not only the tablet reboots, it also goes into software download mode.
- Connect the USB cable from the tablet to the computer.
- Press the volume down button on the tablet to tell it to enter download mode.
- Odin should detect the tablet is connected. If it does, you will see an "Added!!!" message in the Odin interface.
- Click on PDA button and select the file named: CF-Auto-Root-espressowifi-espressowifiue-gtp3113.tar.md5
- To initialize flashing process click on the Start button. It will take a few minutes in this process. Don't touch anything during the process. Wait for the tablet to finish and reboot itself.
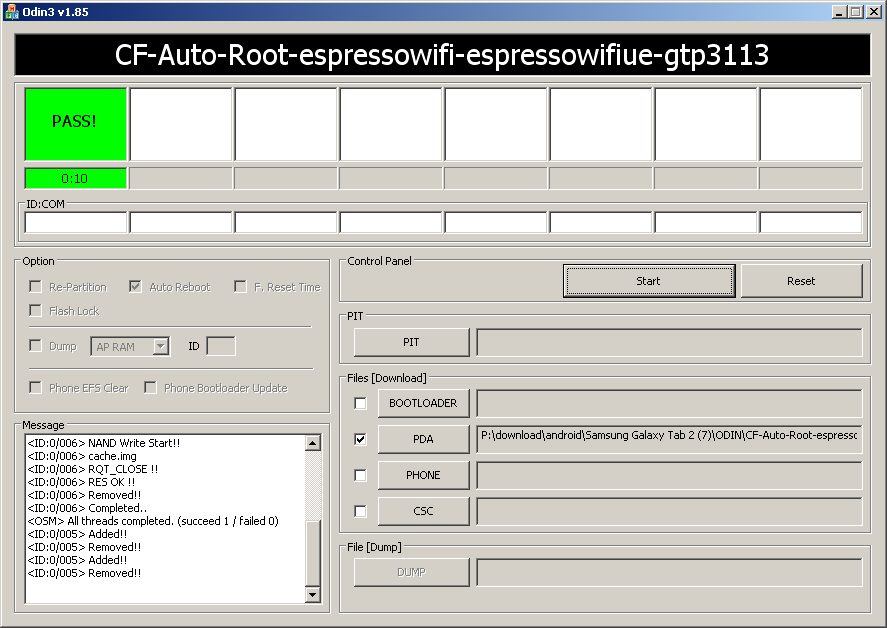
- Tablet gets rebooted automatically after the flashing gets successfully finished. You will get a pass message in Odin’s message box.

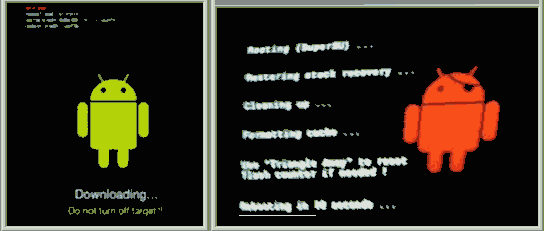
Illustration: Screenshots of the Android tablet during the install process.

Illustration: The Odin interface after successfully flashing the tablet.
Verify Root Access
After the process is done, and the tablet has rebooted, everything should pretty much look the same since we didn't replace TouchWiz. You can always install a custom ROM to replace the TouchWiz interface later, now that the tablet is rooted.
To verify a successful rooting of the tablet simply go to the apps tray and look for SuperSU. If you have ES File Explorer installed you should activate the "root explorer" option under settings. You will be prompted to allow root permission by SuperSU. Once you do that, you will see ES File Explorer listed in the SuperSU interface.
Keywords: Android Tablet PC Samsung Galaxy Tab Two 2