TYT TH-9800
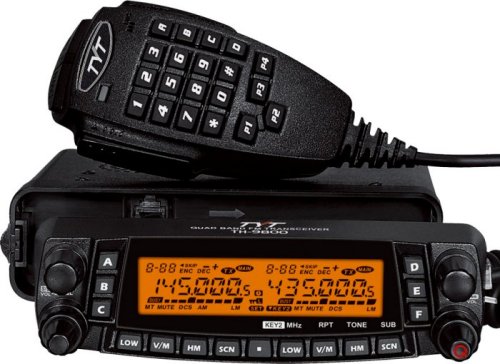
Tytera TH-9800 Quad Band Mobile Transceiver
29/50/144/430 MHz
- 256 memory channels
- DTMF mic included!
- Digital FM broadcast band radio
- High/low output power levels
- Reverse frequency selection
- Dual (V/U) squelch set levels
- Dual repeater offsets selectable
- Multi-function scanning
- Repeater offset selectable
- Keypad lock function
- Channel name editing
- CTCSS/DCS encode/decode
- Dual Band/Dual Receive: (Full Duplex)
- Cross Band Repeat
- TX Power: 5-50 Watts
- Memories: 256
- Antenna Connection: Two SO (UHF)
review
This is similar to the Yaesu FT-8900R, however, this Chinese imitation is actually more capable! Although it lacks some of the refinement of the Yaesu, the Tytera model does allow you to transmit AM modulation. The Yaesu is FM transmit only. You can listen to AM with both, but the Chinese radio is the only one of the two that will allow you to transmit AM, even on Citizen Band channels. Furthermore, the Yaesu requires modification for extended coverage while the Tytera does it out of the box.
The speaker is in the main body and not the detachable control head. The left side has all four bands while the right is 2m and 70cm only. It also will receive from additional frequencies outside of the listed transmit range. Single antenna port. Sensitivity on the receiver is very good.
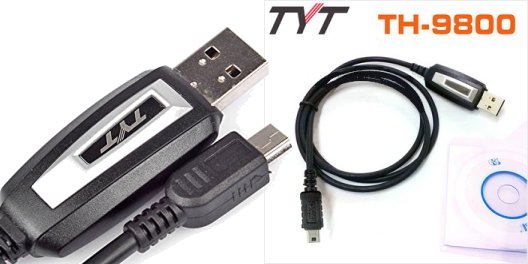
You can program this rig from a computer using the special USB cable. The cable that comes with it is a hacked bootleg knockoff that the Chinese cloned from the well known FDDI chip. The programming software does work, but is crap quality. I have used a Baofeng programming cable with good results.
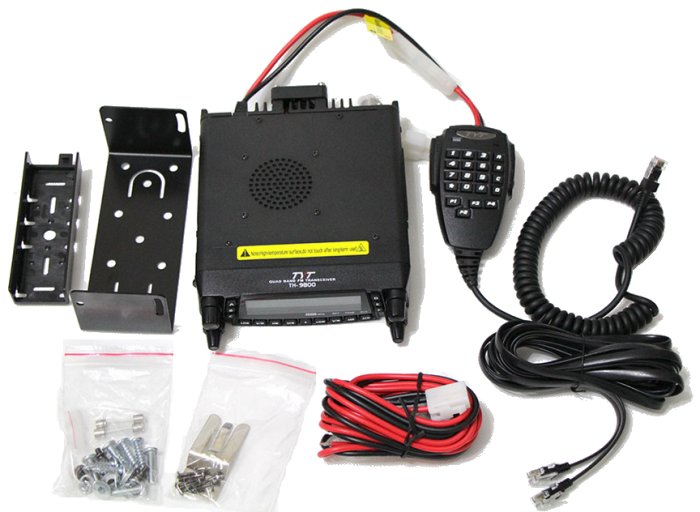
It came with a lot of power cord. With all the copper we've shipped over to China in scrap, I guess they've decided to share some of it back. I didn't need such a long power cord. I guess you could run it from the cab straight through the firewall to under the hood, right past your battery and down the street to your neighbor's car battery.
There are 3 fuses in the power cord. Two on the positive red wire and one on the negative black wire. Most radios have just the single inline fuse in the positive wire.
The package did not include the TYT programming cable for connecting to a PC. This is sold separately even though it is a counterfeit that TYT proudly stamps their name on.
After using this radio for several months in a vehicle, the loud speaker inside the radio burned out. The speaker could not handle normal volume use. I recommend using an external speaker unless you plan to keep the volume turned down relatively low. The audio amplification is excessive for the internal speaker.
Protection of the final stage amplification transistor is present in this radio, but inadequate. Antenna failure during rain resulting in high SWR caused the Amplification MOSFET to fail in the radio. The replacement part costs around $30 - $40 and can be replaced, with care, and good desoldering and soldering technique. This radio uses the same final amplifier transistor as does the Yaesu FT-8900R.
Tone encoded squelch does not seem to work on the primary side (left side) radio, however, works fine on the right side. In the menu, you can select under option 31 "Tone M" one of four options: 1) OFF 2) ENC 3) ENC.DEC 4) DCS. Options 2 and 3 are for PL tone. Option 2 allows tone on transmit, and 3 is tone on transmit as well as tone squelch. There is no option for tone encoded squelch without tone on transmit. When option 3 is used, the tone squelch seems to work fine on the secondary radio (that which is controlled by the right display), however, the primary radio (on the left) it fails to function. Reception of a signal with a squelch tone on the primary does not break squelch, therefore, nothing is heard from the speaker. This is a distinct and aggravating bug. Tone squelch is useless on the primary radio in channel memory or VFO operation.
basic usage
Q: Will the TYT TH-9800 transmit on Citizen Band using AM modulation?
A: Yes, but don't do this, it is illegal. You will die.
Q: I hear this thing is buggy and will glitch out, not even put out full power. True?
A: First release models, yes. Updated model known as PLUS model, no. The updated model is stable enough.
Just going to cover some of the most useful features.
The center button on the bottom with the dot is the "setup" button to access the main configuration options.
The letter buttons around the face of the unit A B C on the left and D E F on the right are a type of memory that stores the configuration including:
- Freq, band, and modulation both sides.
- details...
Press and hold in the letter key to "save" the configuration.
Dials are covered well in the manual.
hand mic
The P1 P2 P3 P4 buttons can be programmed to perform common tasks. The defaults are as follows:
- P1 - switch between left and right side A/B selector
- P2 - switch between VFO/MR which is frequency tuning or memory channel
- P3 - PL modes
- P4 - Xmit power level Low, MLow, MHigh, High
repeater operation
The SET/MENU button is the middle button that has a square dot. Sometimes it is referred to as SET and sometimes MENU. Same button.
- Punch in the frequency of the repeater
- Press MENU, choose menu #27 SHIFT, short press the top knob. For a 2m repeater set to 0.60M.
- Set or verify the correct offset | press top knob to save | Press MENU to go back
- While still in the menu choose #24 RPT.MOD, short press the top knob. This sets HAM Repeater Offset.
- Set APT.+ / APT.- or for simplex choose APT.OFF | press top knob to save | Press MENU to go back
- While still in the menu choose #30 TONE F, short press the top knob. This is to set the PL tone (needed for some repeaters).
- Set the frequency of the PL in HZ | press top knob to save | Press MENU to go back
- While still in the menu choose #31 TONE M, short press the top knob.
- For repeaters with a PL this is typically set to ENC. If the repeater doesn't require PL then set this to OFF. | press top knob to save | Press MENU to go back
Note: A PL tone will not be sent to the repeater unless you have ENC (encode) turned on. Be sure to observe this extra step.
cross band repeat
The TYT TH-9800 does true cross-band repeat. Additionally it has a remote kill option to remotely terminate the cross band repeat.
Menu option #35 is the cross band repeat option.
- Tune the left (primary) to the repeater or frequency you need to communicate with
- Tune the right to the simplex frequency of your HT or portable remote
- Press the [.] button to access program menu
- Select option #35 X-RPT
- Press knob (upper left) to select, observe menu display now says "XSTART"
To exit cross band repeat mode simply press [.] menu button. While in cross band repeat mode you will not be able to change the frequency.
firmware variants
Later version is known as the "Plus" model which has an updated firmware that fixes known issues and user complaints.
programming
Anyone else get sick of stupid Youtube videos? Are young people too stupid to read these days? All they can do is sit and watch a video on how to do things. I like to read it in writing. So I am going to write up some reading for you to read when you want to program your rig.
The manual is serviceable for a roughly Chinese to English translation, which is the norm for these radios. To help out where manual might fail you, I have some programming notes here.
You should know that this radio programs much the same as the Yaesu FT-8900. If you become frustrated while looking for information, you can search under Yaesu FT-8900 to find most answers regarding programming that apply to this radio as well.
program from unit
CTCSS / PL Tone
The programming menu can be activated by a short press of the MENU button.
- CTCSS can be enabled for transmit, or both (tone squelch on receive) by going to MENU item #31 (Tone M). ie Tone Mode
- CTCSS frequency is set by going to MENU item #30 (Tone F). ie Tone Frequency
When the tone mode and frequency are set after you select the frequency you want to add to memory, you can save following the procedure "SAVE TO MEMORY"
REPEATER OFFSET OR SIMPLEX
This transceiver has auto repeater offset shift. It can be enabled via MENU item #2 (ARS). You can also manually set the repeater offset which can be useful for repeaters using reverse offset or simplex.
To manually set the repeater offset use menu item #24 (RPT.MOD).
- Select menu #24 (RPT.MOD) and set to offset shift direction (off, +, -)
- Select menu #27 (SHIFT) and select frequency shift
SAVE TO MEMORY
- Hold down the MENU button to activate memory mode.
- Turn the top knob to select a memory channel.
- Press MENU again to save into memory.
program from a computer
Q: Where do I hook the USB cable to the radio? A: There is a mini-USB port on the back of the radio. It is directly under the red and black power wiring.
Q: What type of cable do I use?
A: It is a USB to MiniUSB cable. A null phone charging cable will not work. The TYT programming cable uses a pirate version of the FTDI USB-to-serial chip. Do not let windows automatically install the driver. Reason explained later. Use the old version FTDI driver on the driver disc. The MiniUSB connector is not the tiny MicroUSB like a modern phone has, it is like the older Motorola phones had, or a Playstation 3 controller charger cable. However, those cables will not work. You must use the cable with the FTDI chip inside. There is a lot of misinformation about this cable online. The Internet is full of morons. Do your homework.
Q: What software do I use?
A: You can use the TYT software or you can use CHIRP.
About the cable: This cable has a 5-pin mini usb type b connector interface. It is a serial interface cable with a microchip. You don’t need a CD with Windows USB drivers unless you are getting obsolete or counterfeit versions of the Prolific PL2303 chips. The cables the Chinese are selling are the counterfeit cables. An authentic cable with the genuine Prolific chip is going to cost you about $40.00. The Chinese clone is going to be $5 or less. Your choice if you want to deal with driver issues.

TYT branded cable with counterfeit PL2303 Chip.
The TYT cable uses the counterfeit chip and therefore you will need to be careful what driver you use if you choose to save money and go with the knockoff. Yeah them Chinese, they do a lot of illegal stuff don't they?
Just to be clear, you have the option of buying a cable with a genuine Prolific PL2303 chip, or you can buy the TYT branded cable with the counterfeit chip. There are probably other counterfeit cables available too advertised for this model.
You can program from Microsoft Windows or Linux.
TYT or Counterfeit Prolific cable on Windows XP
When you connect the cable to a Windows XP SP3 machine a driver will "probably" automatically load. Afterwards, windows will report a problem with the device. Check Windows Device Manager to see if there is a (!) on the Prolific device. If so, then you will need to use an older version of the driver.
Windows XP automatically selects "Prolific USB-to-Serial Comm Port" driver version 2.1.51.238 which will not work with the non-genuine prolific cable. To resolve do the following:
- Disconnect programming cable
- Obtain the file wd_pl2303h-hx-x_v20019v2021.zip
- Unzip / extract the file PL-2303 Driver Installer.exe
- Run PL-2303 Driver Installer.exe
- Reboot computer
- After windows loads, connect the programming cable
Windows should automatically detect the device and now load driver version Driver Version 2.0.2.1 an enable the cable.
To find the necessary zip file you will have to search online.
technical
The microphone connection is a RJ-12 6-wire modular connection.
- Pin 1 - sw2
- Pin 2 - sw1
- Pin 3 - +5v
- Pin 4 - GND
- Pin 5 - MIC/OUT
- Pin 6 - PTT
The faceplate / remote head unit uses a RJ-12 6-wire modulat connection
RJ12 6 Conductor
use: 6pin Rj12 Moble Radio Font Case Extend Cable, RJ12 (6P6C) Make sure you use "straight" wired and not "reverse" wired. The reverse wired will not work and may damage the radio.
Reset
With the radio off, Hold down the LOW button on the left side while pressing the power button on the right. This enters rest options when the radio turns on. There are several reset options.
Final Amplification Transistor
This radio uses the same final amplifier transistor as does the Yaesu FT-8900R, which is the RD70HVF1 MOSFET Power Transistor made by Mitsubishi.
Power Output
Actual bench test results,
2 METER 146MHz FM (into resonant antenna)
Low ... 8w
Mid2 .. 13w
Mid1 .. 28w
High .. 58w
2 METER 146MHz FM (into dummy load)
Low ... 7w
Mid2 .. 10w
Mid1 .. 22w
High .. 49w
70cm 435MHz FM (into dummy load)
Low ... 5w
Mid2 .. 9w
Mid1 .. 17w
High .. 32w
6 METER FM (into dummy load)
Low ...
Mid2 ..
Mid1 ..
High ..
10 METER AM (into dummy load)
Low ...
Mid2 ..
Mid1 ..
High ..
online resources
eHam: TYT9800 Transceiver
http://www.connectsystems.com/products/top/radios%20TH-9800.htm
THIS WIKI PAGE CREATED AND MAINTAINED BY Ke0etZ

