Difference between revisions of "Radio Shack PRO-2096 Scanner"
(→Operation) |
m |
||
| (2 intermediate revisions by 2 users not shown) | |||
| Line 1: | Line 1: | ||
The Pro-2096 was manufactured for Radio Shack by GRE America Inc. The PRO-2096 follows both [[APCO-25|P25 digital]] and analog systems, including 9600bps control channel and C-QPSK modulation. | The Pro-2096 was manufactured for Radio Shack by GRE America Inc. The PRO-2096 follows both [[APCO-25|P25 digital]] and analog systems, including 9600bps control channel and C-QPSK modulation. | ||
| + | |||
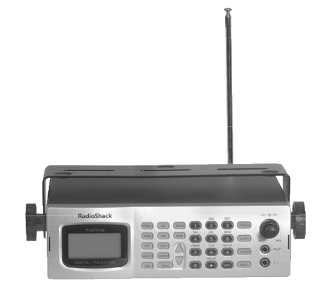
| + | [[Image:rspro2096scannerbw.gif]] | ||
Frequency Coverage | Frequency Coverage | ||
| Line 33: | Line 35: | ||
Delete / Clear frequency from channel | Delete / Clear frequency from channel | ||
* [ PROG ], enter channel #, [ PROG ], enter frequency, [ FUNC ], [ CLEAR ] | * [ PROG ], enter channel #, [ PROG ], enter frequency, [ FUNC ], [ CLEAR ] | ||
| + | |||
| + | or simply navigate to the channel you want to clear and press [ FUNC ], [ CLEAR ] | ||
| + | |||
| + | ===Factory Reset=== | ||
| + | INITALIZING THE SCANNER | ||
| + | |||
| + | 1. Turn off the scanner, then turn it on again. The scanner briefly displays the DSP boot version, then the WELCOME screen.<BR> | ||
| + | 2. Press "0" (zero) while on the WELCOME screen. The scanner displays: | ||
| + | System Tests | ||
| + | Select Test | ||
| + | Exits if no | ||
| + | Key Press | ||
| + | 3. Press "1" (one). The scanner displays: | ||
| + | Factory Init | ||
| + | Erase Memory | ||
| + | ENTER if Yes | ||
| + | CL to Exit | ||
| + | 4. Press ENTER. The scanner displays: | ||
| + | Initializing | ||
| + | Clr Main Mem | ||
| + | V-Scan is OK | ||
| + | Please Wait | ||
| + | DO NOT TURN OFF THE SCANNER UNTIL THE INITIALIZATION IS COMPLETE. | ||
Latest revision as of 15:40, 28 November 2018
The Pro-2096 was manufactured for Radio Shack by GRE America Inc. The PRO-2096 follows both P25 digital and analog systems, including 9600bps control channel and C-QPSK modulation.
Frequency Coverage
Frequency (MHz)        Step Size Value
---------------------------------------------
25-54                  5 kHz
108-136.9875           12.5 kHz
137-174                5, 6.25, or 7.5 kHz
216.0025-221.9975      5 kHz
222.000-225.000        5 kHz
406-512                6.25 kHz
806-823.9875           6.25 kHz
849-868.9875           6.25 kHz
894-960                6.25 kHz
1240-1300              6.25 kHz
Operation
Display
The lightning bolt symbol right of the channel number indicates a signal is being received.
The letter L on the 9th character space top row indicates the channel is locked out.
The first character in the top indicates the mode: (M) manual, (P) program, (S) scan stop on active frequency
Quick Programming
It is quick and easy to program a frequency into this scanner.
- [ PROG ], enter channel #, [ PROG ], enter frequency, [ ENT ]
If you need to enter a PL/CTCSS do the following after storing the frequency
- [ MODE ], [ FUNC ], [ MODE ], [ ↑ ], [ ↓ ], [ ENT ]
Delete / Clear frequency from channel
- [ PROG ], enter channel #, [ PROG ], enter frequency, [ FUNC ], [ CLEAR ]
or simply navigate to the channel you want to clear and press [ FUNC ], [ CLEAR ]
Factory Reset
INITALIZING THE SCANNER
1. Turn off the scanner, then turn it on again. The scanner briefly displays the DSP boot version, then the WELCOME screen.
2. Press "0" (zero) while on the WELCOME screen. The scanner displays:
System Tests
Select Test
Exits if no
Key Press
3. Press "1" (one). The scanner displays:
Factory Init
Erase Memory
ENTER if Yes
CL to Exit
4. Press ENTER. The scanner displays:
Initializing
Clr Main Mem
V-Scan is OK
Please Wait
DO NOT TURN OFF THE SCANNER UNTIL THE INITIALIZATION IS COMPLETE.
reference
- Store Frequency, Manual P 17
- CTCSS Program Memory Channel, Manual P 63
