Difference between revisions of "Macintosh OSX Service Notes"
(→utilities, 3rd party) |
(→Disappearing Scrollbar) |
||
| Line 15: | Line 15: | ||
Since 2011’s “Lion” update to Mac OS X scroll bars are smaller, and disappear until they are needed, a stupid move by Apple since it is no longer obvious when there is more content below on a page, especially when viewing a web page in Safari. ''see; [https://discussions.apple.com/thread/4237680 disappearing scroll bar] ref: scroll bar scrollbar'' | Since 2011’s “Lion” update to Mac OS X scroll bars are smaller, and disappear until they are needed, a stupid move by Apple since it is no longer obvious when there is more content below on a page, especially when viewing a web page in Safari. ''see; [https://discussions.apple.com/thread/4237680 disappearing scroll bar] ref: scroll bar scrollbar'' | ||
| − | + | Instructions to resolve see: [[How_Do_I:_A_Macintosh_OSX_Q%26A#Q:_Stop_the_auto_hide_of_the_menu_bar_and_scroll_bars|Stop Auto Hide of Menu Bar and Scroll Bars]] | |
| − | # | + | |
| − | + | ||
| − | + | Bring back proper scrollbars in Safari and other elements of the desktop: | |
== Apple Diagnostics and Boot Menu == | == Apple Diagnostics and Boot Menu == | ||
Revision as of 07:24, 30 September 2020
2020: Apple's newest Mac operating system is macOS 10.15, also known as macOS Catalina
Contents
Finder
Hold down the command key down while pressing tab multiple times until Finder is highlighted in the pop-up list.
Network preference
- Open System Preferences and click the Network panel icon
- Click the interface you want to configure (probably Ethernet or Wi-Fi).
- Advanced button, etc. all settings.
Interface Annoyances
Disappearing Scrollbar
Since 2011’s “Lion” update to Mac OS X scroll bars are smaller, and disappear until they are needed, a stupid move by Apple since it is no longer obvious when there is more content below on a page, especially when viewing a web page in Safari. see; disappearing scroll bar ref: scroll bar scrollbar
Instructions to resolve see: Stop Auto Hide of Menu Bar and Scroll Bars
Bring back proper scrollbars in Safari and other elements of the desktop:
Apple Diagnostics and Boot Menu
- Mac OS X Snow Leopard or older - will not have a Recovery partition
- Mac OS X older than Sierra - limited Recovery options
Diagnostics: Hold D at boot
Turn on your Mac, then immediately press and hold the D key on your keyboard. Keep holding until you see a screen asking you to choose your language. When Apple Diagnostics knows your language, it displays a progress bar indicating that it's checking the Macintosh. If any issues are found, Apple Diagnostics suggests solutions and provides reference codes.
Sometimes holding D wont kick off the diagnostics, so then you can hold down Option-D at startup to attempt to start Apple Diagnostics over the Internet.
further options:
click ”Get started” or press Command-G to make the Macintosh start from macOS Recovery and displays a web page asking you to choose your country or region. Click ”Agree to send” to send your serial number and reference codes to Apple. Then follow the onscreen service and support instructions. When you're done, you can choose Restart or Shut Down from the Apple menu.
Mac startup key combinations
- Command (⌘)-R: Start up from the built-in macOS Recovery system. Or use
- Option-Command-R or Shift-Option-Command-R to start up from macOS Recovery over the Internet. macOS Recovery installs different versions of macOS, depending on the key combination you use while starting up.
- Option (⌥) or Alt: Start up to Startup Manager, which allows you to choose other available startup disks or volumes.
- Option-Command-P-R: Reset NVRAM or PRAM.
- Shift (⇧): Start up in safe mode. Disabled when using a firmware password.
- D: Start up to the Apple Diagnostics utility. Or use Option-D to start up to this utility over the Internet. Disabled when using a firmware password.
- N: Start up from a NetBoot server, if your Mac supports network startup volumes. To use the default boot image on the server, hold down Option-N instead. Disabled when using a firmware password.
- T: Start up in target disk mode. Disabled when using a firmware password.
- Command-V: Start up in verbose mode.
Restore and Factory Reset
macOS Recovery Mode
- Command + R : install the latest version of macOS that you had installed on your Mac
- Option/Alt + Command + R : upgrade to the latest version of macOS
- Shift + Option + Command + R : install the old crappy version of macOS that came with your Mac
Windows and Mac Keyboard Differences
Mac Key                   Windows Key
----------                ----------
Control                   Ctrl
Option                    Alt
Command (cloverleaf)      Windows
Delete                    Backspace
Return                    Enter
Terminal
Open Terminal / Command Prompt
- Click the Finder icon on the bottom.
- Click Applications on the left pane.
- Click Utilities.
- Click Terminal.
Hard reset terminal emulator state Control-Option-Command-R
Copy user home directory with all user data
- TIP: If you are on Catalina or higher and you wish to use terminal commands to copy your home data, it is recommended you disable the new annoying security prompt
- Open the System Preferences → Security & Privacy → Privacy → select the Full Disk Access.
- Authenticate with your password, and select Terminal to add to the list of exceptions
In linux we use copy -adv however in Mac we use cp -Rv
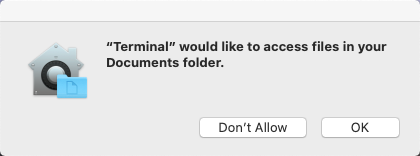
In Catalina you are going to have to deal with new nuisance prompts (feelin like Microsoft) when you try to copy, even with root privileges.
terminal would like to access files in your documents folder
New Stupid Microsoft Like Behavior in Catalina: This is entirely stupid as heck. A ROOT user should not have to deal with this. Also reminds me of the j*ck*ss Android kitkat version.
- macOS 10.15 Catalina Adds Additional Filesystem Restrictions
macOS 10.15 (Catalina) has added additional Privacy restrictions that require user intervention before applications can access the certain portions of the filesystem.
RESTRICTIONS APPLY TO: macOS Catalina requires that you provide access to your Documents, Desktop, Downloads, and Bin folders, iCloud Drive, the folders of third-party cloud storage providers, removable media, and external drives.
- TIP: If you are on Catalina or higher and you wish to use terminal commands to copy your home data, it is recommended you disable the new annoying security prompt
- Open the System Preferences → Security & Privacy → Privacy → select the Full Disk Access.
- Authenticate with your password, and select Terminal (or the file manager you prefer) to add to the list of exceptions
utilities, 3rd party
muCommander
Orthodox 2 panel file manager for Macintosh

