Difference between revisions of "Galaxy G-077ST 2-Way Radio"
m |
|||
| (7 intermediate revisions by one user not shown) | |||
| Line 68: | Line 68: | ||
#In the time of installing the lithium battery pack. please place the batteriu cell lino be cell compartment. ln installation. please note the polarity within the compartment and the cell itself; and | #In the time of installing the lithium battery pack. please place the batteriu cell lino be cell compartment. ln installation. please note the polarity within the compartment and the cell itself; and | ||
#Put the cell compartment where it is and lock tightly the fixed button for the cell cove. | #Put the cell compartment where it is and lock tightly the fixed button for the cell cove. | ||
| + | |||
| + | [[File:galaxyill03.png]] | ||
| + | |||
| + | Insert the battery before connecting the USB charging cable. This walkie talkie has an USB charging cable and can charge the lithium battery in the following manner: | ||
| + | |||
| + | #Lift up the earphone /charger jack cover on the side of this unit; | ||
| + | #Connect usn cable into charging devise such as computer or USB AC m. | ||
| + | #Connect USB cable to the earphone charge jack of radio. In the charging procss, the battery icon will be flashed alter fully charge" battery icon will become full & rennin fix.. | ||
| + | |||
| + | [[File:galaxyill04.png]] | ||
| + | |||
| + | Note: If the battery is charging for the first time, please charge the battery for as long as solid 12 hours. | ||
| + | Also when completion charging, you must take out the USB cable to leave from the radio. it avoid radio become damaged. | ||
| + | |||
| + | ==Low Battery 02eration== | ||
| + | |||
| + | When the battery icon is detected as low voltage. the icon of battery bar will reduce from three battery bar to become only one bar and alert low voltage sound . At this time it is necessary to charge the battery on a timely basis. Otherwise, afier 10 minutes, the radio will be auto-off (with time display screen only). It will stop walkie talkie mode and you should charge the battery at least 6 hours before you use it again. | ||
| + | |||
| + | ==Menu Settings== | ||
| + | |||
| + | '''lst Press MENU button:''' CHANNEL mode, you can press Up/Down key to select your channel; | ||
| + | |||
| + | '''2nd Press MENU button:''' CT CSS & DCS mode, 1-99 sub-channel, you can press Up/Down key to select your sub-channel; | ||
| + | |||
| + | '''3rd Press MENU button:''' VOX mode, voice activate PTI‘ with offi 1-3 level selection, you can press Uprown key to select your ON-OFF with l-3 VOX level selection | ||
| + | |||
| + | '''4th Press MENU button:''' TIME DISPLAY mode, l2 HOURS selection. (“Blank” display show as 24:00 to 11:59 , “pm” display show as l2:00 to 23:59) | ||
| + | |||
| + | '''5th Press MENU button:''' TIME DISPLAY mode. MINUTES selection (“Blank” display show as 24:00 to ll:59 , ‘pm" display show a l2:00 to | ||
| + | 23:59) | ||
| + | |||
| + | '''6th Press MENU button:''' CLOCK ALARM mode, you can press Up/Down key to select your clock alarm ON-OFF. If you select ON, you need | ||
| + | continue to select the clock alarm time. | ||
| + | |||
| + | '''7th Press MENU button:''' CALL ALERT TONE mode, you can press Up/Down key to select your call tone (9 call tome selection). | ||
| + | |||
| + | '''8th Press MENU button:''' VOICE SCRAMBLER mode, you can press Up/Down key to select voice scrambler ON-OFF. | ||
| + | |||
| + | '''9th Press MENU button:''' STOP WATCH mode, you can press UplDown key to start the time counting of stop watch. then press Up/Down key to | ||
| + | stop the time counting of stop watch. | ||
| + | |||
| + | '''10th Press MENU button:''' SOS mode. you can press Up/Down key to select 808 emergency alarm ON~OFF with 3-5. 5-5 10-5 alarm time selection. If you select oN with desired alarm time, then you see SOS icon, To activate SOS emergency alarm. you need press SCAN key until SOS icon become flash, then alarm sound will be continue calling until you press SCAN key again and see SOS become fix, the alarm sound will be stopped. | ||
| + | |||
| + | ==Special Key Setting== | ||
| + | |||
| + | * SCAN mode Press SCAN button : Activate channel scan, you can press Up/Down key to change channel scan direction If you press scan button again. it will exit from scan mode. | ||
| + | * FM RADIO mode Press & Hold UP button : Activate FM radio, you can press Up/Down key to select your desired radio channel fiom 875ole to 108.ooMH2. lfyouptess&holdUPbuttonagain, itwillexit fi’omradiomode. | ||
| + | |||
| + | ==Using Earphone== | ||
| + | |||
| + | * Lifl up the earphone/charger jack cover on the side of the unit; | ||
| + | * Insert the earphone plug into the earphone/charger jack and adjust the iocation of your earphone; | ||
| + | * Set the talker into the VOX mode. When the VOX function is set to ON, you do not inve to keep pressing the earphone/talk key for any talks. When the VOX function is set to OFF, keep pressing the earphone talt key for talks; and | ||
| + | * When you use your ear plmte to heartheothersidetakpressUpkeyorDawn keytoadjust vohimetoanappropriatelevel. | ||
| + | |||
| + | ==Technical Specifications== | ||
| + | |||
| + | License free country: Europe/Hongkong/USA for your option | ||
| + | Channels available: 8/20/22 channels for your opdon | ||
| + | Opening frequency: 446/409/462 MHz 0 | ||
| + | |||
| + | Powct: 3.7V lithium battery | ||
| + | |||
| + | Output power: 0.5W minum | ||
| + | |||
| + | Service life of cells: On the basis of services | ||
| + | |||
| + | Receiving range: up to 7km (in open space but no guarantee) | ||
| + | USB charging: ~ 5V DC | ||
| + | |||
| + | TX power current: ~ 300 mA | ||
| + | |||
| + | RX power current: ~ 100 mA | ||
| + | |||
| + | Stantby cunem: ~ 50 mA | ||
| + | |||
| + | Time mode current: ~ SmA | ||
| + | |||
| + | |||
[[Category:Electronics]] | [[Category:Electronics]] | ||
[[Category:Radio]] | [[Category:Radio]] | ||
[[Category:Tangible Product]] | [[Category:Tangible Product]] | ||
| + | [[Category:2-Way Radio]] | ||
| + | [[Category:FCC Part 95]] | ||
Latest revision as of 10:32, 28 April 2024
This is a 2-way FRS/GMRS wristwatch style walkie talkie system.
Contents
Principal Characteristics of this Unit
- Watch type with adjustable watch band;
- This radio was made in TXCO control and one-to-more radios mication; FM Radio fl'om 87.5oMH2 to 108MHz
- With effective communicative distance up to 7 kilometers in open :1pr but no guarantee;
- CTCSS and DCS 1-99 sub-channel encode & decode;
- Voice scrambler prevent other radios listening;
- VOX, voice activate PTT with 1-3 level selection;
- Clock alarm & SOS emergency alarm
- lZ-hour/pm display.
- Stop watch
- Using 3.7V lithium battery pack;
- USB charging with battery protection circuit
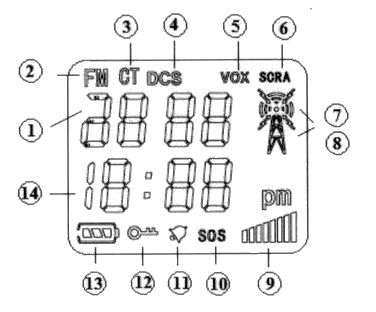
Liguid Cgstal Display Screen
- Channel numbers (00) : Display the current channel
- FM : FM Radio from 87.5oMH2 to 108MHz
- CT : 1-38 CT CSS sub-channel
- DCS : 39-99 DCS sub-channel
- VOX : Voice activate PTT
- SCRA : Voice scrambler
- Transmission indicator : Indicator in the time of sending messages;
- Receiving indicator : indicator in the time of receiving messages;
- Volume level bar : Display the current volume setup;
- SOS : Emergency alarm call
- Clock alarm
- NIL
- Battery capacity display
- 12 hour/pm time display
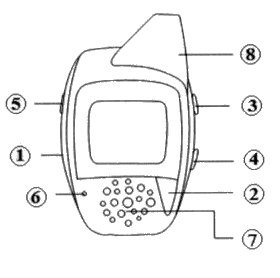
Description of Structure
- POWER/MENU key (Keep pressing the POWER switch) : When you keep pressing the key, it gives a short music sound to start the menu and enter the setting function;
- PTT key (Press To Talk I CALL (Call alert) : Keep pressing this key to send voice message. and quickly press it twice to send CALL alert tone;
- UP key : Adjust volume (in the default state), Adjust channels and time in the menu state;
- DOWN key : Adjust volume (in the default state), Adjust channels and time in the menu state;
- SCAN key : Press this key to enter the channel scanning;
- MIC : Built-in microphone;
- Speaker : Built-in speaker;
- Antenna 2 For TX/RX
Points for Attention
This unit is in conpliance with the communication control standards. so the following rules and regulations must be observed:
- While you use the unit, we do not guarantee that secrets will not be disclosed in communication (even use in Voice Scrambler);
- There must not be any harmful interference to be caused when you use iii. unit. This unit must accept interference, if any;
- Any unauthorized changes in or adjustment of the built-in setup such a charging frequency, launching power. or extending antennas. etc beyond the specified range are illegal acts, or even lead to a breach of telecommunication management and control;
- Do not use this unit where there is danger. including gas stations, hospitals, airports or any other gas or electric places without shield protection;
- Do not use any detergent or thinner to wipe or clean this unit. Only use dry, alkaline-free or well-distributed soft cloth to clean batteries, etc;
- You can have an ideal talking effect. Please put the antenna upward during the intercommunication of the talker, and keep it 5 centimeters away from your face talking in your nomial voice; and
- This talker has inner cell protection functions. If you do not use it for long, please take out the cells; and you must charge the cells every 6 months.
Battery Installation
!WARNING - Do not connect the USB charging cable if there is no battery in the radio unit! Doing so could damage the radio!
Lithium battery pack (attached with the unit) is applied to this talker. The installation and replacement of cells are described as follows:
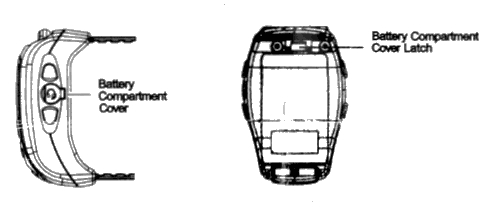
- Press down the fixed button on the side of the battery cover of this unit to we. be battery cover;
- In the time of installing the lithium battery pack. please place the batteriu cell lino be cell compartment. ln installation. please note the polarity within the compartment and the cell itself; and
- Put the cell compartment where it is and lock tightly the fixed button for the cell cove.
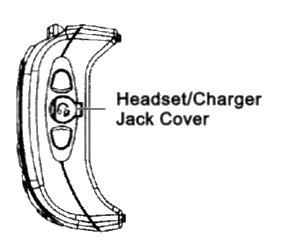
Insert the battery before connecting the USB charging cable. This walkie talkie has an USB charging cable and can charge the lithium battery in the following manner:
- Lift up the earphone /charger jack cover on the side of this unit;
- Connect usn cable into charging devise such as computer or USB AC m.
- Connect USB cable to the earphone charge jack of radio. In the charging procss, the battery icon will be flashed alter fully charge" battery icon will become full & rennin fix..
Note: If the battery is charging for the first time, please charge the battery for as long as solid 12 hours. Also when completion charging, you must take out the USB cable to leave from the radio. it avoid radio become damaged.
Low Battery 02eration
When the battery icon is detected as low voltage. the icon of battery bar will reduce from three battery bar to become only one bar and alert low voltage sound . At this time it is necessary to charge the battery on a timely basis. Otherwise, afier 10 minutes, the radio will be auto-off (with time display screen only). It will stop walkie talkie mode and you should charge the battery at least 6 hours before you use it again.
Menu Settings
lst Press MENU button: CHANNEL mode, you can press Up/Down key to select your channel;
2nd Press MENU button: CT CSS & DCS mode, 1-99 sub-channel, you can press Up/Down key to select your sub-channel;
3rd Press MENU button: VOX mode, voice activate PTI‘ with offi 1-3 level selection, you can press Uprown key to select your ON-OFF with l-3 VOX level selection
4th Press MENU button: TIME DISPLAY mode, l2 HOURS selection. (“Blank” display show as 24:00 to 11:59 , “pm” display show as l2:00 to 23:59)
5th Press MENU button: TIME DISPLAY mode. MINUTES selection (“Blank” display show as 24:00 to ll:59 , ‘pm" display show a l2:00 to 23:59)
6th Press MENU button: CLOCK ALARM mode, you can press Up/Down key to select your clock alarm ON-OFF. If you select ON, you need continue to select the clock alarm time.
7th Press MENU button: CALL ALERT TONE mode, you can press Up/Down key to select your call tone (9 call tome selection).
8th Press MENU button: VOICE SCRAMBLER mode, you can press Up/Down key to select voice scrambler ON-OFF.
9th Press MENU button: STOP WATCH mode, you can press UplDown key to start the time counting of stop watch. then press Up/Down key to stop the time counting of stop watch.
10th Press MENU button: SOS mode. you can press Up/Down key to select 808 emergency alarm ON~OFF with 3-5. 5-5 10-5 alarm time selection. If you select oN with desired alarm time, then you see SOS icon, To activate SOS emergency alarm. you need press SCAN key until SOS icon become flash, then alarm sound will be continue calling until you press SCAN key again and see SOS become fix, the alarm sound will be stopped.
Special Key Setting
- SCAN mode Press SCAN button : Activate channel scan, you can press Up/Down key to change channel scan direction If you press scan button again. it will exit from scan mode.
- FM RADIO mode Press & Hold UP button : Activate FM radio, you can press Up/Down key to select your desired radio channel fiom 875ole to 108.ooMH2. lfyouptess&holdUPbuttonagain, itwillexit fi’omradiomode.
Using Earphone
- Lifl up the earphone/charger jack cover on the side of the unit;
- Insert the earphone plug into the earphone/charger jack and adjust the iocation of your earphone;
- Set the talker into the VOX mode. When the VOX function is set to ON, you do not inve to keep pressing the earphone/talk key for any talks. When the VOX function is set to OFF, keep pressing the earphone talt key for talks; and
- When you use your ear plmte to heartheothersidetakpressUpkeyorDawn keytoadjust vohimetoanappropriatelevel.
Technical Specifications
License free country: Europe/Hongkong/USA for your option Channels available: 8/20/22 channels for your opdon Opening frequency: 446/409/462 MHz 0
Powct: 3.7V lithium battery
Output power: 0.5W minum
Service life of cells: On the basis of services
Receiving range: up to 7km (in open space but no guarantee) USB charging: ~ 5V DC
TX power current: ~ 300 mA
RX power current: ~ 100 mA
Stantby cunem: ~ 50 mA
Time mode current: ~ SmA


