Most interior details, mainly walls and closets, are built with 2x4s.
Typical Wall Framing
- Mark the centerline of the new wall across the ceiling. At each end of the line, measure and mark half the width of the new wall's top plate in one direction. Snap a chalk line between these marks. Plan one stud at each end and, from the end that meets a wall, measure 151/4 inches to locate the inside edge of the first intermediate stud, then 16 inches to the same edge of each additional stud (16-inch stud spacing standard).
- Lay the top and bottom plates side by side on the floor. Measure where each wall stud will go and mark with perpendicular lines across the plates, using a combination square.
- Locate the joists in the ceiling and hold the top plate in position along the guideline marked on the ceiling and nail through the ceiling material and into each joist with two 3 1/2-inch nails.
- Use a plumb bob (string with weight) from each end of the top plate on the ceiling to just above the floor, then mark the floor to establish the bottom plate's location directly below it. Snap a chalk line along the floor between the marks as a guide for the bottom plate's edge. Nail the plate with 3-inch nails staggered and spaced every 16 inches.
- Install the studs and check plumb using a carpenter's level and nail into place.
- Where one wall intersects another, double-up studs.
- If the wall will turn a corner, frame with two full-length studs that have blocks sandwiched in between
Frame a Doorway
- When framing up the wall, mark the location for the door rough opening. That opening should be 2.5 inches wider and 1 3/4 inches higher than the door itself. As an example, a 30-inch door will have a rough opening of 32.5 inches by 6 feet 9 3/4 inches.
- Saw through the top of the sole plate (bottom horizontal framing member of the wall) at the inside edges of the king studs (the regular length studs to which header members are attached).
- Measure and cut two jack studs (studs that do not run the full height of the floor to ceiling, used to support heavier framing at both sides of a door, window, or other opening) so they are 1 and 3/4 inches longer than the height of the door. A jack stud is a partial stud nailed next to full studs to support the header at the door opening. The first studs on either side, the jack studs, go only as high as the rough opening of the doorway. On top of those go a double header.
- Nail the jack studs to the frame studs with 8d nails placed one foot apart from top to bottom.
- Cut two 2x4s each 35 and 1/2 inches long (for a 30-inch door) and nail them together. Place this double header on top of the jack studs. Secure them by driving two 16d nails through each side of the door frame studs.
- Measure the opening between the top of the header and the top plate, and cut three cripple studs. Nail one against each frame stud, and center the third over the door opening.
Standard Interior Door Size: 30 inches x 80 inches
Use a rough out of 32.5 inches x 81 3/4 inches ~~ or others recommend 32 x 82 inches.
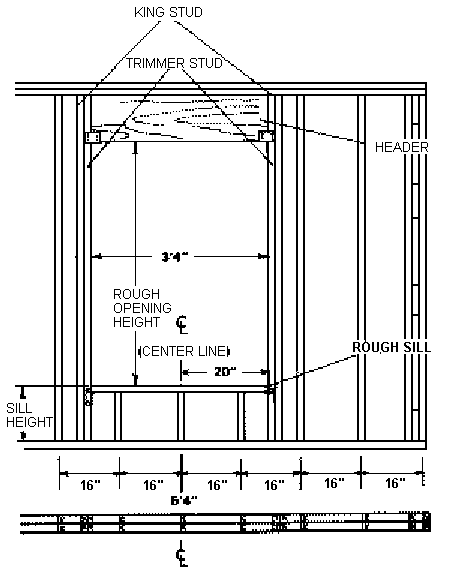
Frame a Window
Header - Supports weight of rafters, ceiling, and floor joists from above. Should be built three inches longer than the window rough opening width.
King Stud - Runs from bottom to top plate and is nailed on both ends of the header.
Trimmers - Are nailed to the inside of king studs and under both sides of the header. The trimmers are cut to the same length as the window rough openings height.
Window Sill - Is the same length as the header and nailed to the bottom of the trimmers and to the king studs.
Cripples - Are nailed to window sill lay out marks and king studs to support the window sill.
