Difference between revisions of "Talk:1987 Pontiac Fiero"
m (→1987 Fiero Fuel Sending Unit) |
(→4 cylinder alternator removal: new section) |
||
| Line 17: | Line 17: | ||
rodneydickman.com - Explains how to modify them, shows images | rodneydickman.com - Explains how to modify them, shows images | ||
* [https://rodneydickman.com/product_info.php?products_id=549 Gas Tank Sending Unit] - Includes a new fuel pump and strainer. Also the steel clamping ring and o ring. Fits 1985-1988. The 84 Fiero is different. | * [https://rodneydickman.com/product_info.php?products_id=549 Gas Tank Sending Unit] - Includes a new fuel pump and strainer. Also the steel clamping ring and o ring. Fits 1985-1988. The 84 Fiero is different. | ||
| + | |||
| + | == 4 cylinder alternator removal == | ||
| + | |||
| + | [https://www.fiero.nl/forum/Archives/Archive-000001/HTML/20031110-2-038759.html I just changed mine b4 driving to the 20th.] | ||
| + | |||
| + | 1. Remove dog bone / trunk wall bolt. | ||
| + | 2. Loosen other dog bone bolt and rotate bone onto valve cover. | ||
| + | 3. Jack up passenger side. Put on jack stands. DISCONNECT BATTERY. Remove serpentine belt by cranking tensioner pully bolt clockwise. | ||
| + | 4. Remove rear passenger wheel. Remove lower alternator bolt from underneath / wheel well. | ||
| + | 5. Remove alternator bracket to alt bolt from on top. | ||
| + | 6. Hinge alternator towards trunk. This will make electrical connections more accessible if you have A/C. Disconnect electrical connections at alternator. Remove alternator hinge bolt. | ||
| + | 7. If you have an automatic like me, remove bolt that holds trans dipstick in place. Rotate dipstick out of the way. | ||
| + | 8. Push engine towards passenger compartment while removing alternator at trans dipstick location (two people or some device to hold engine required). | ||
| + | 9. Install in opposite order. | ||
| + | |||
| + | When I replaced my serp belt, I had to rotate the engine by wrench on crank bolt to make it ride onto one of the larger pulleys. Apparently the new belt was a tight fit. (I turned the crankshaft while my partner held tensioner at loosest point.) | ||
| + | |||
| + | I also broke a rubber vacuum line from throttle body to trunk wall. $1.50 fix. | ||
| + | |||
| + | ------------------ | ||
| + | 88 4cyl auto Fiero, AC, sunroof | ||
| + | "And isn't sanity really just a one-trick pony anyway? I mean all you get is one trick, rational thinking, but when you're good and crazy, oooh, oooh, oooh, the sky is the limit!" - The Tick | ||
| + | |||
| + | ANOTHER COMMENT: | ||
| + | |||
| + | If you need it, the drive belt tensioner is a dealer part, GM #10041248. It lists for $68.31 at gmpartsdirect.com or $59.21 at paceparts.com. The tensioner also seals the end of the engine water jacket. As the Ogre says, that part goes out quite often. | ||
| + | |||
| + | Also, you can get the alternator out without removing the rear wheel. You do have to push forward on the engine (dogbone removed) and move the alternator to the left side of the engine to remove it. Helps to get the throttle cables out of the way first. | ||
| + | |||
| + | |||
| + | make sure the pulley nut is tight on the new alternator. | ||
| + | |||
| + | |||
| + | DIPSTICK: On an automatic you'll have to be really careful about the dipstick tube. You may have to take out the bolt that supports it and turn the tube. (Don't pull it out.) Be warned that this could start a leak and you may have to replace the O ring on the tube later. | ||
Revision as of 19:56, 7 August 2024
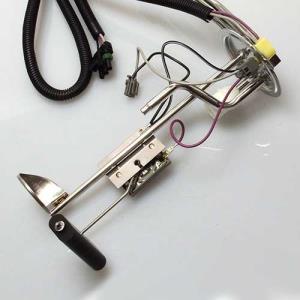
1987 Fiero Fuel Sending Unit
This is a discontinued part, the OEM is no longer available from GM.
Other Name: Sender Assembly, Fuel; Fuel Gauge Sending Unit
eBay (two different sizes)
- 150mm Fuel Sending Unit Boat Truck Water Level Metering Gauge Sensor 240-33ohms
- 265mm Gas Fuel Sending Unit Boat Truck Water Level Gauge Sensor Kit 240-33ohms
The Fiero Store
- 84-88 Fuel Sending Unit - requires an adapter (P/N 60915) to fit 4 cyl base model.
-

GMPartsGiant
- Fuel Sender Assembly (Discontinued) P/N: GM 25093531
rodneydickman.com - Explains how to modify them, shows images
- Gas Tank Sending Unit - Includes a new fuel pump and strainer. Also the steel clamping ring and o ring. Fits 1985-1988. The 84 Fiero is different.
4 cylinder alternator removal
I just changed mine b4 driving to the 20th.
1. Remove dog bone / trunk wall bolt. 2. Loosen other dog bone bolt and rotate bone onto valve cover. 3. Jack up passenger side. Put on jack stands. DISCONNECT BATTERY. Remove serpentine belt by cranking tensioner pully bolt clockwise. 4. Remove rear passenger wheel. Remove lower alternator bolt from underneath / wheel well. 5. Remove alternator bracket to alt bolt from on top. 6. Hinge alternator towards trunk. This will make electrical connections more accessible if you have A/C. Disconnect electrical connections at alternator. Remove alternator hinge bolt. 7. If you have an automatic like me, remove bolt that holds trans dipstick in place. Rotate dipstick out of the way. 8. Push engine towards passenger compartment while removing alternator at trans dipstick location (two people or some device to hold engine required). 9. Install in opposite order.
When I replaced my serp belt, I had to rotate the engine by wrench on crank bolt to make it ride onto one of the larger pulleys. Apparently the new belt was a tight fit. (I turned the crankshaft while my partner held tensioner at loosest point.)
I also broke a rubber vacuum line from throttle body to trunk wall. $1.50 fix.
88 4cyl auto Fiero, AC, sunroof "And isn't sanity really just a one-trick pony anyway? I mean all you get is one trick, rational thinking, but when you're good and crazy, oooh, oooh, oooh, the sky is the limit!" - The Tick
ANOTHER COMMENT:
If you need it, the drive belt tensioner is a dealer part, GM #10041248. It lists for $68.31 at gmpartsdirect.com or $59.21 at paceparts.com. The tensioner also seals the end of the engine water jacket. As the Ogre says, that part goes out quite often.
Also, you can get the alternator out without removing the rear wheel. You do have to push forward on the engine (dogbone removed) and move the alternator to the left side of the engine to remove it. Helps to get the throttle cables out of the way first.
make sure the pulley nut is tight on the new alternator.
DIPSTICK: On an automatic you'll have to be really careful about the dipstick tube. You may have to take out the bolt that supports it and turn the tube. (Don't pull it out.) Be warned that this could start a leak and you may have to replace the O ring on the tube later.