Difference between revisions of "HFDY Malahit DSP SDR v3"
m (→Basic Usage) |
m (→power on and tune) |
||
| Line 24: | Line 24: | ||
== Basic Usage == | == Basic Usage == | ||
| − | === power on and | + | === power on volume, and tuning === |
* short press the power button (between the two encoder knobs) to power the unit on | * short press the power button (between the two encoder knobs) to power the unit on | ||
* short press again to power save - turns off LCD | * short press again to power save - turns off LCD | ||
| Line 35: | Line 35: | ||
# volume - loudness | # volume - loudness | ||
# filter - narrow, normal, and wide to filter out adjacent signal (impacts sound quality) | # filter - narrow, normal, and wide to filter out adjacent signal (impacts sound quality) | ||
| − | * function indicated in top right of LCD | + | * function indicated in top right of LCD |
| + | the tuning encoder adjusts the frequency in steps you can define | ||
| + | * short press tuning encoder to adjust tuning frequency steps. for FM broadcast set to 1.0 MHz. | ||
| + | * long press the tuning encoder to lock the tuning frequency | ||
| + | other ways to tune: using the LCD touch screen | ||
| + | * tap the frequency indicator on the LCD screen to manually enter a frequency (ensure tuning is unlocked) | ||
| + | * tap the spectrum display to adjust frequency in small increments | ||
| + | |||
| + | adjust modulation mode (AM, FM, SSB, etc...) | ||
| + | * tap the mode visual key 5th on the bottom row | ||
| + | |||
| + | Example: Tuning in an FM broadcast station, setting correct modulation, filter, and mode. Example, tune in 101.9 FM | ||
| + | # tap the frequency display and enter 101.9 then tap Mhz | ||
| + | # tap the MODE softkey on the bottom row and select WFM (wide frequency modulation) | ||
| + | # short press the volume encoder until FILTER is selected (to the right of volume) and set to FLT WIDE | ||
| + | # short press the volume encoder until ATT is selected and set to 0 or increase attenuation if you are in a strong signal area | ||
| + | # short press the volume encoder to return to volume function | ||
=== two antenna connectors === | === two antenna connectors === | ||
Revision as of 10:13, 12 November 2023
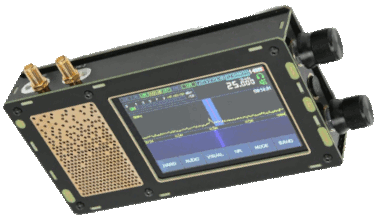
Malahit DSP SDR V3 50KHz - 2GHz DSP SDR Receiver. This is an all-in-one portable SDR that is controlled via a touch screen and two encoders. In a review it was concluded the quality of the HFDY unit exceeds that of the Russia-made DSP-2.
New V3 Malachite Radio Dual Antenna Latest Version 1.10D Malahit-DSP Stereo Portable 3rd Version SDR Receiver 50KHz-2GHz
- Based on the SDR architecture, the msi001 radio frequency front-end 12bit quantization sampling is adopted, and the processor adopts STM32H743, the main frequency is up to 480 MHz;
- The receiving frequency is 50kHz to 49.999MHz, 50.001MHz to 249.999MHz, 400MHz to 2GHz;
- Demodulation type: AM, SSB, NFM, WFM, CW;
- Sensitivity is better than 0.2-0.3μV;
- Anti-blocking is better than 85 dB;
- Real-time sampling bandwidth is 160 kHz;
- Function: variable filter, adaptive noise reduction, threshold noise reduction, noise suppressor, AGC, equalizer, etc.;
- Display screen is IPS 3.5 inches, capacitive touch screen with backlight adjustment;
- The battery capacity is 3000mAh, USB-TYPEC interface;
- The working current does not exceed 300mA;
- Optional front-end attenuation filter components, attenuation up to 30dB;
- Connect to the computer via USB, which can realize CAT, IQ and audio communication;
- The size of the whole machine is 147×77×25mm.
The HFDY Chinese model is advertised as: HFDY Registered 50K-2GHz V1.10d Malahiteam SDR Receiver Radio DSP SDR Receiver 3.5" Touch LCD with Code support Two Antenna V3
This SDR unit is _not_ well documented. Information is sketchy at best. Information will be added here as it becomes available via our own testing and from other sources. Our first goal is to document general operation of the device.
Contents
Basic Usage
power on volume, and tuning
- short press the power button (between the two encoder knobs) to power the unit on
- short press again to power save - turns off LCD
- long press the power button to turn the unit off.
encoder scanning is hit and miss: what this means is that sometimes when you press or turn a control the radio will not react. this is a deficiency in the software. do not give up or assume it is defective. simply continue to turn the encoder or try tapping the LCD a bit longer.
volume encoder modes: the top encoder knob not only adjusts volume, but also does other functions. volume encoder functions
- attenuator - adjust sensitivity of reception
- volume - loudness
- filter - narrow, normal, and wide to filter out adjacent signal (impacts sound quality)
- function indicated in top right of LCD
the tuning encoder adjusts the frequency in steps you can define
- short press tuning encoder to adjust tuning frequency steps. for FM broadcast set to 1.0 MHz.
- long press the tuning encoder to lock the tuning frequency
other ways to tune: using the LCD touch screen
- tap the frequency indicator on the LCD screen to manually enter a frequency (ensure tuning is unlocked)
- tap the spectrum display to adjust frequency in small increments
adjust modulation mode (AM, FM, SSB, etc...)
- tap the mode visual key 5th on the bottom row
Example: Tuning in an FM broadcast station, setting correct modulation, filter, and mode. Example, tune in 101.9 FM
- tap the frequency display and enter 101.9 then tap Mhz
- tap the MODE softkey on the bottom row and select WFM (wide frequency modulation)
- short press the volume encoder until FILTER is selected (to the right of volume) and set to FLT WIDE
- short press the volume encoder until ATT is selected and set to 0 or increase attenuation if you are in a strong signal area
- short press the volume encoder to return to volume function
two antenna connectors
Each of these sma connectors has an LED indicator next to it that shows whether that particular antenna is being used, either 50 ohm or Hi-Z. If you have the HDFY Chinese version you will notice that both may remain connected at the same time.
HFDY clone in comparison with the Russia-made DSP-2
Firmware
Determine Version
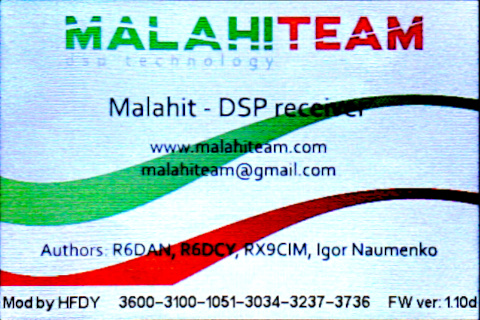
How do you find out the firmware version: When you first power the unit on, by long pressing the power button, the initial screen will offer information including the current firmware version.
Versions Compared
The HFDY Malahit SDR V3 firmware is adequate and offers most of the features that are important in comparison with the Russia-made DSP-2.
- 1.10c Firmware on Chinese Clone
The HFDY SDR uses 1.10c firmware whereas the Russian-made DSP-2 uses the latest official 2.10D firmware.
The Chinese-made HFDY leaves out a large portion of the military AIR band, with no coverage from 250MHz to 400MHz, or about 150MHz, whereas the Russian-made DSP2 only loses 20MHz from 380MHz to 400MHz.
Howto Update
Users have successfully flashed the latest Russian firmware on the Chinese HFDY unit. Caution! It is risky to flash the firmware as a failure in the flash process could render the device completely unusable without a recovery option.
How to upgrade the firmware. The dfu-utils package on Ubuntu and similar distributions is installed by typing:
sudo apt install dfu-utils
there's more... (a lot more)
MalahitSDR on Reddit
New firmware releases are discussed.
PC Connection
The Malahit SDR will not charge off the computer USB port if the Malahit SDR is not powered on. When powered on, it will both charge and connect to the PC as an external sound card. It appears as an external sound device. It is capabile of both input and output sound. When connected it will appear (address may vary) as:
Bus 003 Device 112: ID ffff:0737 MicroGenSF Malahit reciever
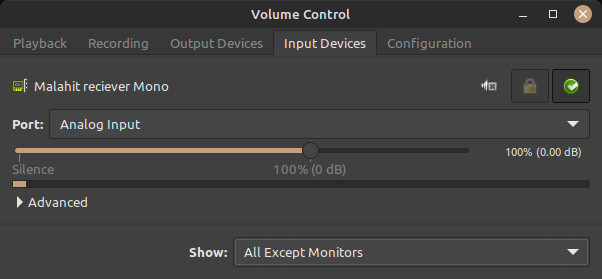
It is visible in PulseAudio Control
The audio is available for capture and recording using software such as Audacity. In order to hear the audio from the capture device you will need a loopback module active, same as if you wanted to monitor the audio on your live microphone.
Module should automatically create loopback outputs for available input devices. To load the module manually
pactl load-module module-loopback
To make the change persistent, append /etc/pulse/default.pa with
load-module module-loopback
To stop it running, run:
pactl unload-module module-loopback
Loopback quality is poor for some reason, there is a timing issue.
The Malachite-DSP also supports CAT and IQ connections to a host PC. The Malachite-DSP "borrows" the CAT (Rig Control) profile of a Kenwood TS-480. When the Malachite-DSP is connected to the Linux computer via USB, it creates several serial ports such as:
- /dev/ttyACM0
- /dev/ttyACM1


